route
A comprehensive guide to viewing and manipulating the IP routing table in Linux
route Command
Introduction
The route command is a traditional Linux networking utility used to view and manipulate the IP routing table. It allows system administrators to configure static routes, set up default gateways, and manage how network packets are forwarded between different networks and interfaces.
The routing table acts as a map that determines the path network packets take to reach their destination. By using the route command, administrators can control network traffic flow, troubleshoot connectivity issues, and optimize network performance.
While the route command is still widely used, it's considered a legacy tool from the net-tools package. Modern Linux distributions are gradually transitioning to the more powerful and versatile ip route command from the iproute2 package. However, many system administrators still prefer route for its simplicity and familiarity.
Installation
The route command is part of the net-tools package, which may not be installed by default on newer Linux distributions. To install it:
Debian/Ubuntu-based Systems
Red Hat/CentOS/Fedora Systems
Arch Linux
Basic Syntax
The basic syntax of the route command is:
Where:
- options: Various flags that modify the behavior of the command
- command: The action to perform (add, del, etc.)
- destination: The destination network or host
- gateway: The gateway address for the route
- netmask: The network mask for the destination
- metric: The metric value for the route (priority)
- dev interface: The network interface to use
Basic Usage
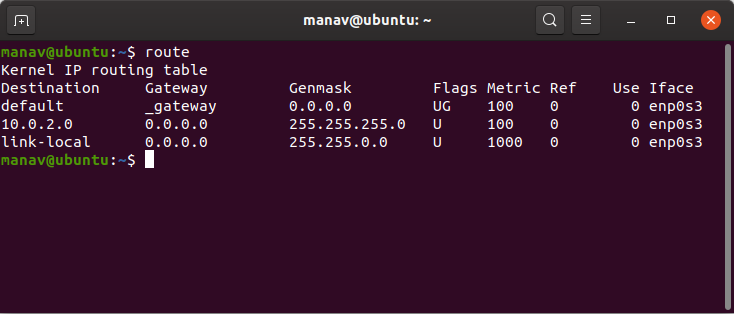
Displaying the Routing Table
To display the current routing table:
This shows the routing table with hostnames and network names resolved.
Displaying the Routing Table in Numeric Format
To display the routing table with IP addresses instead of hostnames:
This is useful when DNS resolution is slow or unavailable, or when you need to see the actual IP addresses.
Understanding the Output
The output of the route command includes several columns:
- Destination: The destination network or host
- Gateway: The gateway address (an asterisk indicates no gateway is needed)
- Genmask: The netmask for the destination
- Flags: Various routing flags
- U: Route is up
- G: Route uses a gateway
- H: Target is a host (not a network)
- !: Reject route
- Metric: The distance to the target (lower is preferred)
- Ref: Number of references to this route
- Use: Count of lookups for the route
- Iface: The interface to which packets for this route will be sent
Advanced Usage
Adding a Default Gateway
To add a default gateway (the router that handles traffic for destinations not explicitly listed in the routing table):
Replace 192.168.1.1 with your router's IP address.
Deleting the Default Gateway
To remove the default gateway:
Caution: This may disconnect you from networks outside your local subnet.
Adding a Static Route
To add a static route to a specific network:
This routes traffic for the 10.0.0.0/24 network through the gateway at 192.168.1.254.
Adding a Host Route
To add a route to a specific host:
This routes traffic for the specific host 10.0.0.1 through the gateway at 192.168.1.254.
Specifying an Interface for a Route
To add a route that uses a specific network interface:
This routes traffic for the 10.0.0.0/24 network through the eth0 interface.
Rejecting Traffic to a Host or Network
To create a route that rejects traffic to a specific host:
This causes the system to respond with "Network is unreachable" when attempting to communicate with 192.168.1.51.
Displaying the Kernel's Routing Cache
To display the kernel's routing cache (if available):
The routing cache helps speed up routing decisions by caching recent lookups.
Practical Examples
Setting Up Multiple Network Interfaces
If your system has multiple network interfaces connected to different networks:
Creating a Static Route to a Remote Network
To access a remote network through a specific gateway:
This allows your system to reach the 172.16.0.0/16 network through the gateway at 192.168.1.254.
Troubleshooting Network Connectivity
If you're having trouble reaching a specific network:
Setting Up a Router
To configure a Linux system as a router between two networks:
Making Routes Persistent
Routes added with the route command are not persistent and will be lost after a system reboot. To make routes persistent, you need to configure them in your distribution's network configuration files.
Debian/Ubuntu
Edit the interfaces file:
Add the following lines:
Red Hat/CentOS
Create a route configuration file for each interface:
Add the following lines:
Using netplan (Ubuntu 18.04+)
Edit your netplan configuration:
Add routes to the configuration:
Apply the configuration:
Comparison with ip route
The ip route command from the iproute2 package is the modern replacement for route. Here's a comparison of common commands:
| Task | route Command | ip route Command |
|---|---|---|
| Show routing table | route -n | ip route |
| Add default gateway | route add default gw 192.168.1.1 | ip route add default via 192.168.1.1 |
| Delete default gateway | route del default | ip route del default |
| Add network route | route add -net 10.0.0.0 netmask 255.255.255.0 gw 192.168.1.254 | ip route add 10.0.0.0/24 via 192.168.1.254 |
| Add host route | route add -host 10.0.0.1 gw 192.168.1.254 | ip route add 10.0.0.1/32 via 192.168.1.254 |
| Delete route | route del -net 10.0.0.0 netmask 255.255.255.0 | ip route del 10.0.0.0/24 |
| Show local routes | Not directly available | ip route show table local |
Advantages of ip route over route
- More consistent syntax
- Support for advanced routing features (policy routing, multiple routing tables)
- Better support for IPv6
- More detailed output options
- Active development and maintenance
Common Options Reference
| Option | Description |
|---|---|
-n | Display numerical addresses instead of trying to resolve hostnames |
-e | Display the routing table in a more verbose format |
-F | Display the Forwarding Information Base (FIB) |
-C | Display the routing cache instead of the FIB |
-v | Select verbose operation |
-A family | Use the specified address family (inet, inet6) |
-net | The target is a network |
-host | The target is a host |
reject | Set up a blocking route |
mod, del, add | Modify, delete or add a route |
dev interface | Force the route to be associated with the specified device |
netmask mask | Specify the netmask |
gw gateway | Route packets via a gateway |
metric M | Set the metric field in the routing table |
Troubleshooting
Common Issues
"SIOCADDRT: Network is unreachable"
This error occurs when you try to add a route through a gateway that's not directly reachable:
"SIOCADDRT: File exists"
This error occurs when you try to add a route that already exists:
Routes Not Working After Reboot
Routes added with the route command are not persistent:
Unable to Reach Specific Networks
If you can't reach certain networks despite having routes configured:
Best Practices
Security Considerations
- Avoid Unnecessary Routes: Only add routes that are necessary for your network topology
- Use Reject Routes: Use reject routes to explicitly block traffic to sensitive networks
- Consider Firewall Rules: Remember that routing and firewalling work together to control traffic flow
Performance Optimization
- Minimize Route Lookups: Keep your routing table as simple as possible
- Use Metrics Wisely: Set appropriate metrics to ensure traffic takes the optimal path
- Consider Route Caching: On high-traffic systems, ensure the routing cache is properly sized
Documentation
- Document Your Routes: Keep documentation of your routing configuration
- Use Comments: Add comments in configuration files explaining the purpose of each route
- Create Network Diagrams: Maintain network diagrams showing how routes connect different networks
Conclusion
The route command is a fundamental tool for managing network routing in Linux systems. While it's gradually being replaced by the more powerful ip route command, it remains widely used due to its simplicity and familiarity.
Understanding how to use route to view and manipulate the routing table is essential for network administrators, as it allows them to control how traffic flows through their networks, troubleshoot connectivity issues, and optimize network performance.
For modern Linux systems, it's recommended to learn both the traditional route command and its successor ip route, as you're likely to encounter both in various environments. The ip route command offers more features and better support for modern networking requirements, but the route command's straightforward syntax makes it valuable for quick checks and basic configuration tasks.
Test Your Knowledge
Take a quiz to reinforce what you've learned
Exam Preparation
Access short and long answer questions for written exams